「センサーをラズパイに接続し、MiNiFiでセンサーデータをTailする。そしてNiFiに転送して、NiFiでHDFS, Hiveに書き込む」の手順をご紹介します。
実現したいこと
- MiNiFiでセンサーデータを取得し、NiFiに転送する
- NiFiでセンサーデータをRawデータとしてKafka経由でHDFSに保存する
- NiFiでセンサーデータをHiveテーブルに保存する
- NiFiでデータを加工し、温度が閾値を超えたら、Slackアラート通知する
環境情報
- センサーをラズパイに接続
- ラズパイでセンサーデータを取るPythonスクリプト
- HDP3.1(Hadoop 3.1.1, Hive 3.1.0) & HDF 3.3.1(NiFi 1.8.0, Kafka 2.0.0)、クラスタは同一Ambariで管理
構成
構成は以下の様な感じになります。パース処理のところは一つしか書いてないですが、複数のパース処理の集合だと思ってください。

全体データフロー
- RemoteMiNiFiというInput portとProcessDataというPrecess Groupで構成されています。

- ProcessDataグループ内の詳細フロー

やってみよう
1、MiNiFiのセットアップ
ラズパイ自体のOSインストールや、センサーとの接続ができた状態(ここでは割愛します)でMiNiFiのインストールをやります。
MiNiFiのTarファイルはHortonworksサイトにあります。
https://docs.hortonworks.com/HDPDocuments/HDF3/HDF-3.3.1/release-notes/content/hdf_repository_locations.html
sudo su -
cd /home/pi

#HortonworksのサイトからMiNiFiのtarファイルをダウンロードする
curl -O http://public-repo-1.hortonworks.com/HDF/3.3.1.0/minifi-0.6.0.3.3.1.0-10-bin.tar.gz
curl -O http://public-repo-1.hortonworks.com/HDF/3.3.1.0/minifi-toolkit-0.6.0.3.3.1.0-10-bin.tar.gz

#ファイル解答し、シンボリックリンクを作成する
tar -zxvf minifi-0.6.0.3.3.1.0-10-bin.tar.gz
tar -zxvf minifi-toolkit-0.6.0.3.3.1.0-10-bin.tar.gz
ln -s minifi-0.6.0.3.3.1.0-10 minifi
ln -s minifi-toolkit-0.6.0.3.3.1.0-10 tool_minifi

#MiNiFiをインストールする
./minifi/bin/minifi.sh install
#必要に応じてリモートNiFiホストを/etc/hostsに追加する
2、センサーデータをPythonスクリプトで取得
Pythonスクリプトは/home/pi/bme280-dataフォルダに2019-06-04.csvのようなファイルが生成されます。
中身は:「センサーID, 日付, 時間, 気圧, 温度, 湿度」のカンマ区切りのデータになります。
1,2019-06-04,23:59:51,1011.54,24.86,50.67
#coding: utf-8
import bme280_custom
import datetime
import os

dir_path = '/home/pi/bme280-data’
now = datetime.datetime.now()
filename = now.strftime('%Y-%m-%d’)
label = now.strftime('%H:%M:%S’)
csv = bme280_custom.readData()
if not os.path.exists('/home/pi/bme280-data’):
  os.makedirs('/home/pi/bme280-data’)
f = open('/home/pi/bme280-data/'+filename+'.csv','a’)
f.write('1,'+filename +","+label+","+csv+"\n")
f.close()
このスクリプトをCronとかで定期的に実行するように設定する(例えば10秒ごとに実行)
3、NiFiでデータフローを作成し、MiNiFiに配布
MiNiFiで直接データフローを作成するのが難しいので、NiFiで作成して、テンプレート(.xml)としてエクスポート、MiNiFi toolkitで.xmlを.ymlに変換するのが一般的です。
今回はTailFileプロセッサとRemoteProcessGroupを使います。
- NiFiのTop画面でInput portを追加する。名前をRemoteMiNiFiに設定する

- TailFileプロセッサでフォルダの.csvファイルを取り込みます。以下のプロパティを設定します。
Tailing mode: Multiple files
File(s) to Tail: .*.csv
Base Directory: /home/pi/bme280-data

- Remote Process Groupを以下のように設定して、RemoteMiNiFiをInput Portとして選択する
URLsにNiFiのURL(http://hdp-srv4.demotest.com:9090/nifi)を指定する。複数ある場合は、カンマ区切りで入力する。
Transport ProtocolでHTTPを選択する。

- 作ったデータフローをテンプレートにエクスポートする
TailFileプロセッサとRemoteProcessGroupを繋いで、全部選択して、右クリック、「Create template」でテンプレートを作成する。
作成したら、ダウンロードする

- MiNiFiでテンプレートファイル(.xml)から.ymlファイルに変換する
ラズパイにログインして、以下のコマンドでファイルを変換して、MiNiFiを起動する
sudo su -
cd /home/pi

#MiNiFi toolkitでxmlからymlに変換する
./tool_minifi/bin/config.sh transform /home/pi/sensor_minifi4.xml ./sensor_minifi4.yml

#既存のconfig.ymlファイルをバックアップし、新しいymlで上書きする
cp -p minifi/conf/config.yml minifi/conf/config.yml.bk
cp -p sensor_minifi4.yml minifi/conf/config.yml

#MiNiFiプロセスを起動する。他にstop, restartなどオプションがある
./minifi/bin/minifi.sh start
ここまできたら、MiNiFiからセンサーデータをNiFiの方に転送できるようになります。
4、NiFiでセンサーデータをRawデータとしてKafka経由でHDFSに保存する
ここからは、NiFiでセンサーデータをKafka経由でHDFSに保存するデータフローを作成していきます。
全体のデータフローはこんな感じです。

-
NiFi画面でUser1というProcess Groupをドラッグ&ドロップする。すでに作成済みのRemoteMiNiFi input portと繋ぐ

User1グループをダブルクリックで入って後続のフロー作成に入ります。
-
FromMinifiというInput portとPublishKafka_2_0プロセッサを作成して、繋ぐ

PublishKafka_2_0のPROPERTIESタブで必要なプロパティを設定する。
Kafka Brokers: hdp-srv1.demotest.com:6667,hdp-srv2.demotest.com:6667,hdp-srv3.demotest.com:6667 を入力
Topic Name: sensor_data_user1
Delivery Guarantee: Guarantee Replicated Delivery を選択

PublishKafka_2_0のSETTINGSタブでfailureとsuccess両方をチェックする。

-
ConsumeKafka_2_0プロセッサを追加する
Kafka Brokers: hdp-srv1.demotest.com:6667,hdp-srv2.demotest.com:6667,hdp-srv3.demotest.com:6667 を入力
Topic Name: sensor_data_user1
Group ID: group1_user1

-
MergeContentプロセッサを追加する
Minimum Number of Entries: 10 に変更

-
PutHDFSプロセッサを追加する
Hadoop Configuration Resources: /etc/hadoop/conf/core-site.xml,/etc/hadoop/conf/hdfs-site.xml
Directory: /tmp/sensor_data/user1

SETTINGSタブでsuccessをチェックする

-
最後にLogAttributeプロセッサを追加する
PROPERTIESタブは既定のままで、SETTINGSタブでsuccessをチェックする

MergeContentのoriginal, failure, PutHDFSのfailureと繋ぐ
-
HDFS上のファイルの中身を見てみる

5、NiFiでセンサーデータをHiveテーブルに保存する
ここでHive Streamingを使ってセンサーデータをリアルタイムにHiveテーブルに追加します。
これを実現するには、Hiveテーブルがいくつか要件を満たす必要があります。
詳細はこちらをご参照くださいStreamingDataIngest-StreamingRequirements
1,ACIDサポートのため、hive-site.xmlに以下3つのパラメータを設定(HDP3.1ではすでに設定ずみ)
hive.txn.manager = org.apache.hadoop.hive.ql.lockmgr.DbTxnManager
hive.compactor.initiator.on = true
hive.compactor.worker.threads > 0

2,テーブル作成時に以下を含むことが必要
STORED AS ORC
tblproperties("transactional"="true")
CLUSTERED BY (cloumn-name) INTO <num> BUCKETS
下記の通りでテーブル(sensor_data_user1)を作成します。
CREATE TABLE sensor_data_user1(id int,time_str string, pressure double, temperature double, humidity double)
PARTITIONED BY(date_str string)
CLUSTERED BY (id) INTO 5 BUCKETS
STORED AS ORC
tblproperties("transactional" = "true");
この部分のデータフローは図の通りになります。

これからプロセッサを説明していきます。
- UpdateAttributeプロセッサを追加し、FromMinifi input portと接続する

- UpdateAttributeのPROPERTIESタブでschema.name=sensor_data_schema1を追加する

- ConvertRecordプロセッサを追加する。CSVをAvroに変換
Record Reader: CSVReaderを選択
Record Writer: AvroRecordSetWriterを選択

CSVReaderの→をクリックする。
Controller ServicesタブでAvroRecordSetWriterとCSVReaderが追加される。

⚙をクリックする。
Schema Access Strategy: Use ‘Schema Name’ Propertyを選択
Schema Registryで Create new service… を選択する

AvroSchemaRegistry… を選択してCreateをクリックする

Schema Registryで AvroSchemaRegistryが表示される。→をクリックする。Save changes before going to Controller Service?が表示され、Yesクリックする

Controller ServicesタブでAvoSchemaRegistryが追加される
⚙をクリックする

Propertiesタブでプロパティ sensor_data_schema1を追加する
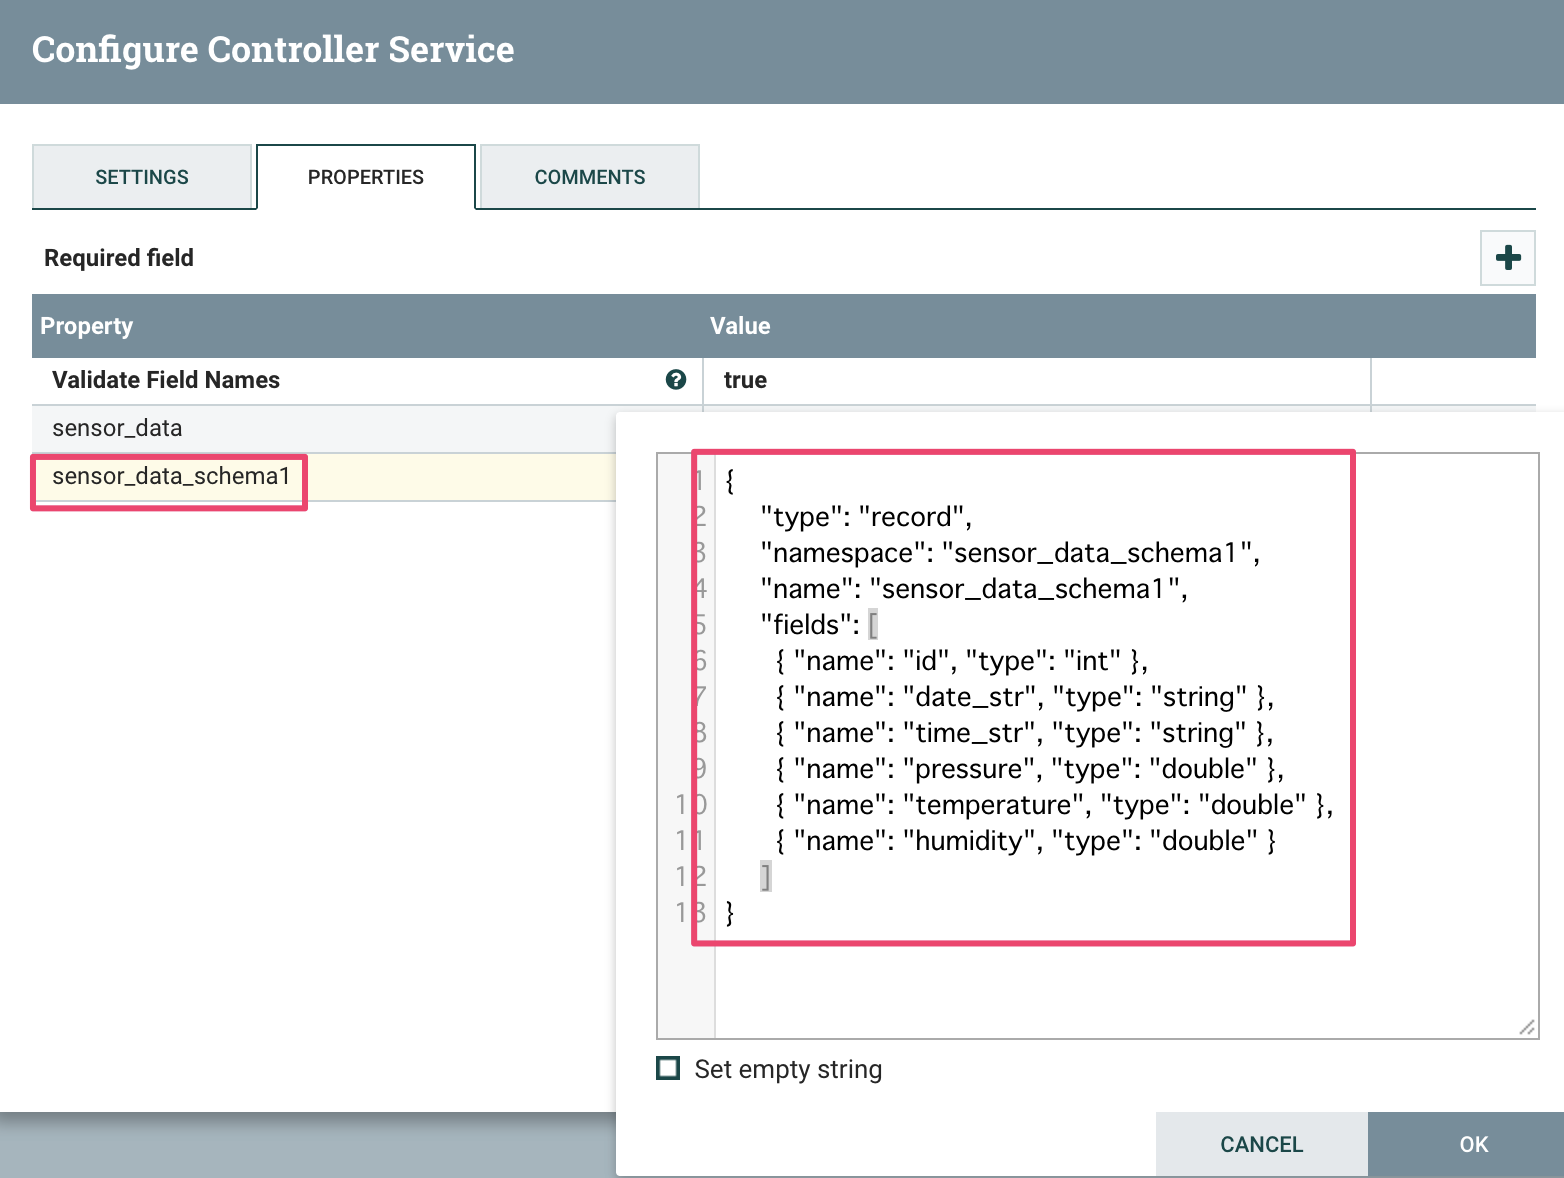
Avroスキーマは下記の通り
	{
	     "type": "record",
	     "namespace": "sensor_data_schema1",
	     "name": "sensor_data_schema1",
	     "fields": [
           { "name": "id", "type": "int" },
	       { "name": "date_str", "type": "string" },
	       { "name": "time_str", "type": "string" },
	       { "name": "pressure", "type": "double" },
	       { "name": "temperature", "type": "double" },
	       { "name": "humidity", "type": "double" }
	     ]
	}
終わったら、CSVReaderがInvalid、AvroSchemaRegistryがDisabledの状態。
赤枠のアイコンをクリックしてAvroSchemaRegistryを有効にする(Enable→Closeをクリックする)。
 CSVReaderも有効にする

最後にAvroRecordSetWriterも既定のままで有効にする

ConvertRecordのfailureをLogAttributeに繋ぐ
- PutHive3Streamingプロセッサを追加する

PutHive3StreamingのPropertiesタブで以下の値を設定する
Record Reader: AvroReaderを選択
Hive Metastore URL: thrift://hdp-srv3.demotest.com:9083を入力
Hive Configuration Resources: /etc/hive/conf/hive-site.xml,/etc/hadoop/conf/core-site.xml,/etc/hadoop/conf/hdfs-site.xmlを入力
Database Name: defaultを入力
Table Name: sensor_data_user1を入力

Record Readerの→をクリックし、AvroReaderを有効にする(Enable→Close)

PutHive3StreamingのSettingsタブでsuccessをチェックする

- PutHive3StreamingのfaiureとretryをLogAttributeに接続する
- Zeppelinでクエリを実行して確認
時間軸で温度の変化を表しています。

6、NiFiでデータを加工し、温度が閾値を超えたら、Slackアラート通知する
CSV形式のデータ「1,2019-06-04,23:59:51,1011.54,24.86,50.67」から温度を取得して、閾値(ここでは30度)を超えたらSlackにアラート通知します。
全体のデータフロー

- ExtractTextプロセッサを追加する
Propertiesタブでfieldプロパティを追加、値を(.*),(.*),(.*),(.*),(.*),(.*)に設定
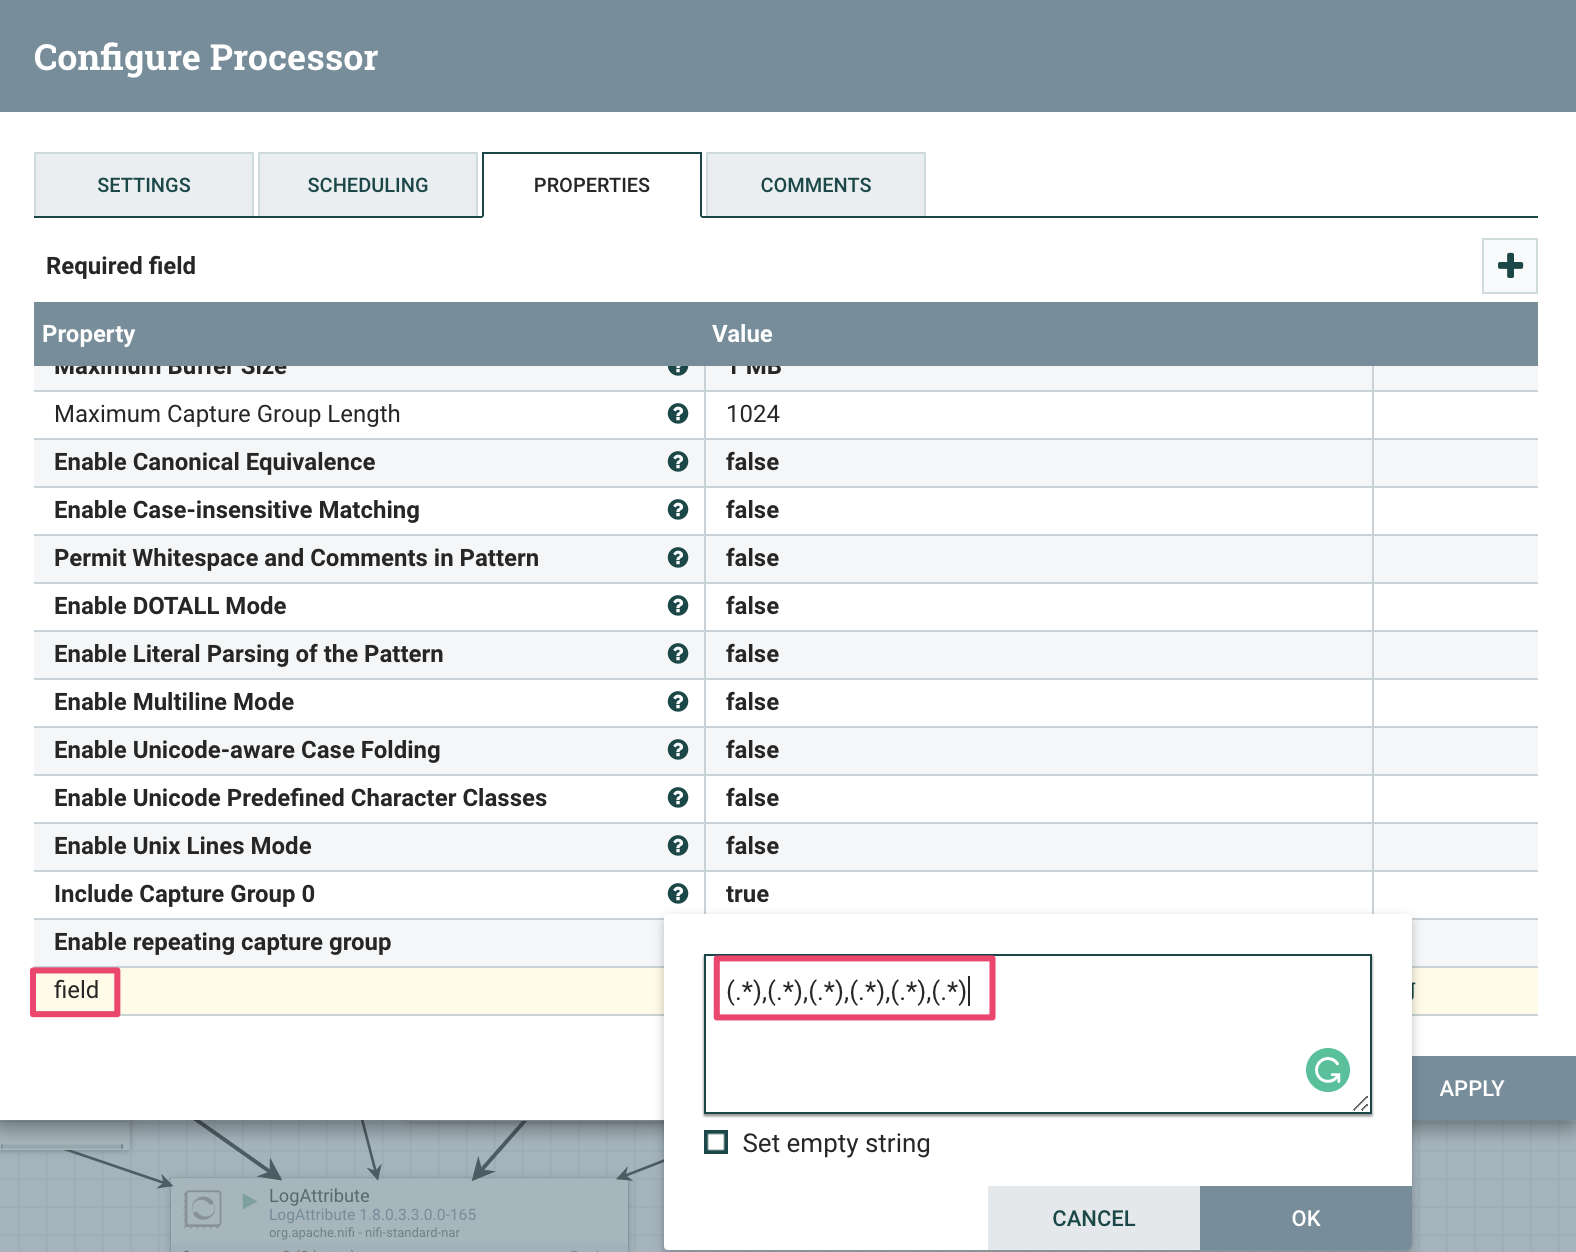
Settingsタブでunmatchedをチェックする

- RouteOnAttributeプロセッサを追加する
Propertiesタブでhighプロパティを追加、値を${field.5:gt(40)} に設定する
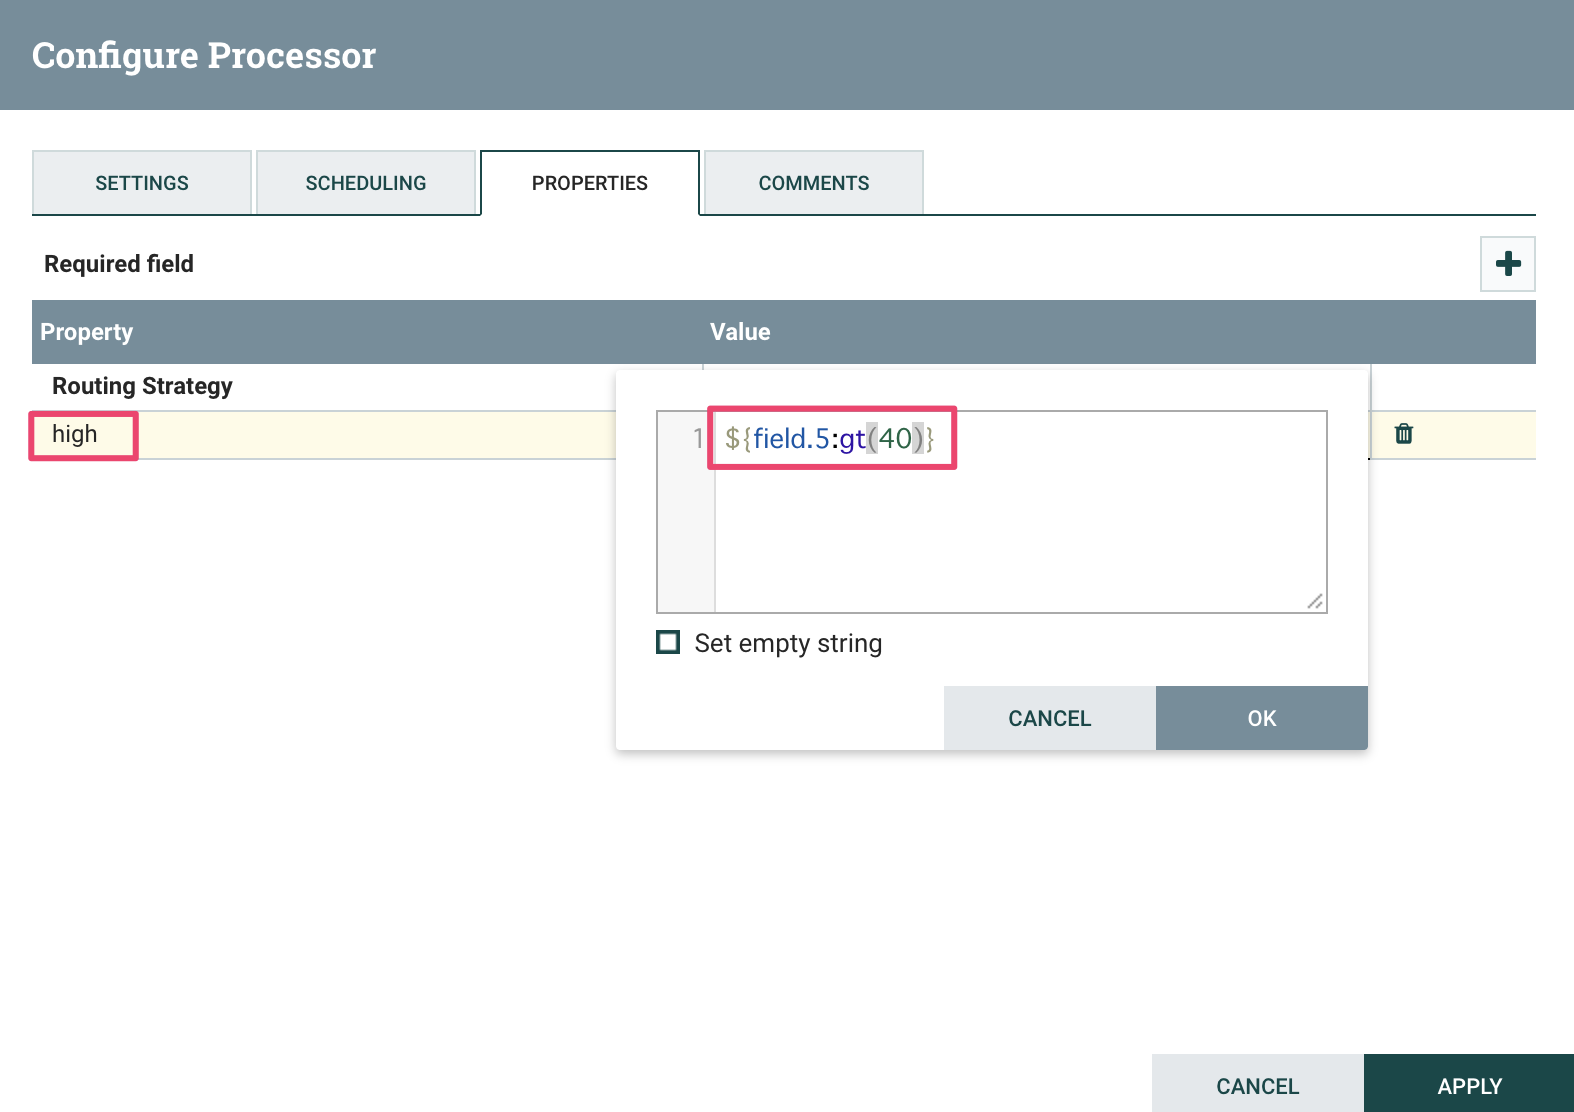
Settingsタブでunmatchedをチェックする

Settingsタブでsuccessをチェックする

- PutSlackのfailureをLogAttributeに接続する
- Slackメッセージ確認

最後のメモ: 事前準備
# Kafka topic作成
cd /usr/hdp/current/kafka-broker
./kafka-topics.sh --create --zookeeper hdp-srv1.demotest.com:218,hdp-srv2.demotest.com:2181,hdp-srv3.demotest.com:2181 --replication-factor 3 --partitions 1 --topic sensor_data_user1

# HDFS folder作成
sudo su - hdfs
hdfs dfs -mkdir -p /tmp/sensor_data/user1
hdfs dfs -chmod -R 777 /tmp/sensor_data/user1

# sensor_data_user1テーブルにNiFiユーザーにrwx権限追加
hdfs dfs -setfacl -m -R user:nifi:rwx /warehouse/tablespace/managed/hive/sensor_data_user1


